במאמר הקודם במדריך למדנו איך להתקין mocha ולעבוד איתו. מה שעוד למדנו זה איך מתקינים את supertest ואף כתבנו בדיקת דמה.
ה-app.js שלנו נראה כך:
var express = require('express');
var app = express();
var help = require('./help');

app.listen(3000, function () {
  console.log('Example app listening on port 3000!');
});

app.set('view engine', 'ejs');

//Routers.
app.use('/help', help);

//The 404 Route (ALWAYS Keep this as the last route).
app.get('*', function(req, res){
  res.send('404 page', 404);
  //You can use template too! res.render('404-page');

});

//500 Middleware
app.use(function(err, req, res, next) {
  console.error(err.stack);
  res.status(500).send('Something broke!');
  //You can use template too! res.render('500-page');
});

module.exports = app;
שימו לב שבשורה האחרונה אני חושף את ה-app שלי באמצעות module.export. זה קריטי עבור קבצי הבדיקה שלנו.
הראוטר שלנו הוא help/ ויש לו דף של about-me. הראוטר נראה כך:
var express = require('express');
var router = express.Router();

router.get('/about-me', function(req, res) {

  var children = [
    { id: 1, name: "Omri" },
    { id: 2, name: "Kfir" },
    { id: 3, name: "Daniel" },
    { id: 3, name: "Michal" }
  ];

  res.render('about-me', {pageName : 'About Me', children: children});
});

module.exports = router;
הבדיקה שלנו נמצאת בתיקית test ושמה הוא test.js. אנו זוכרים שאנחנו לא חייבים להכניס את כל הבדיקות שלנו לתוך test.js. ספרית mocha יודעת לעבור על כל הקבצים עם סיומת js ולהריץ אותם אחד אחרי השני. הבדיקה כרגע נראית כך:
var request = require('supertest'),
  app = require('../app.js');

describe('help router', function(){ //Name of the tests collection
  it('GET about-me should return 200', function(done){ //Single test
    request(app) //Initiating the supertest with the app
      .get('/help/about-me')//Send GET to localhost:3000/help/about-me
      .expect(200, done);
  });
});
הבדיקה הזו שולחת בקשת GET אל http://localhost:3000/help/about-me ורואה אם אנחנו מקבלים 200 שזה קוד HTTP שמשמעותו היא 'הצלחה'. אבל בדרך כלל זה לא מספיק לנו, אנחנו רוצים גם לבדוק דברים אחרים. בדיוק בשביל זה יש לנו את הדוקומנטציה הבסיסית של supertest ושם יש דוגמאות מעניינות. כך למשל, אם אנחנו רוצים לוודא headers מסוימים, אני יכול. אחד ה-headers הפופולרי הוא סוג התוכן. זה מאוד חשוב אם אני עובד על API שחייב להחזיר header של json. הנה דוגמה:
describe('help router', function(){ //Name of the tests collection
  it('GET about-me should return 200', function(done){ //Single test
    request(app) //Initiating the supertest with the app
      .get('/help/about-me')//Send GET to localhost:3000/help/about-me
      .expect('Content-Type', /html/)
      .expect(200, done)
  });
});
כאן אני בודק את ה-content-type, שהוא Header שאני מצפה לו מעמוד HTML.
אני יכול לבדוק גם את התוכן. למשל, בדיקה שהוא קיים. נשאלת השאלה – איך אני ניגש בכלל אל התוכן? בדיוק בשביל זה יש לי את מתודת end, שבה אני יכול לקבל את ה-response. אם אני אריץ את הקוד הבא:
var request = require('supertest'),
  app = require('../app.js');

describe('help router', function(){ //Name of the tests collection
  it('GET about-me should return 200', function(done){ //Single test
    request(app) //Initiating the supertest with the app
      .get('/help/about-me')//Send GET to localhost:3000/help/about-me
      .expect('Content-Type', /html/)
      .expect(200)
      .end(function(err, res) {
        var text = res.text; //The response content, i.e. the HTML.
        console.log(text);
        done();
        if (err) throw err;
      });
  });
});
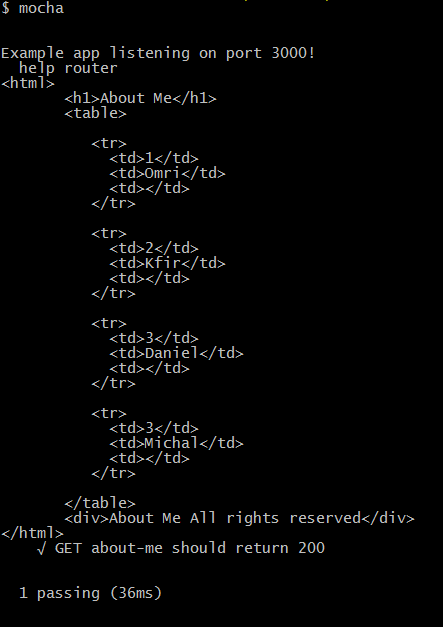
ואני אריץ את mocha בקונסולה, אני אראה את התגובה מהשרת על הקונסולה. אם עקבתם אחרי המדריך וקראתם את הפרק שבו הסברתי על מנועי טמפלייט, לא תופתעו אם אני אומר לכם שהפלט נראה כך:

שימו לב שאני חייב, אבל חייב, לקרוא ל-done אם אני משתמש במתודת end. מתודת done מסמנת ל-mocha שהבדיקה הסתיימה ואפשר להמשיך הלאה. אם לא נקרא ל-done, הבדיקה לא תסתיים לעולם, תיכשל ואחרי 2 שניות נקבל התראה שהבדיקה נכשלה בגלל שגיאת timeout.
אם אני רוצה לבדוק את הטקסט שלי, אני צריך מודולים של בדיקות, אחד מהם הוא המודול assert שהוא מודול ליבה של node.js. כיוון שהוא מודול ליבה, אני לא צריך להתקין אותו אלא לעשות לו require בלבד.
var request = require('supertest'),
  app = require('../app.js'),
  assert = require('assert');

describe('help router', function(){ //Name of the tests collection
  it('GET about-me should return 200', function(done){ //Single test
    request(app) //Initiating the supertest with the app
      .get('/help/about-me')//Send GET to localhost:3000/help/about-me
      .expect('Content-Type', /html/)
      .expect(200)
      .end(function(err, res) {
        var text = res.text; //The response content, i.e. the HTML.
        assert.notEqual(text.length, 0); //Using assert native node.js module method.
        done();
        if (err) throw err;
      });
  });
});
כאן אני בודק שאורך הפלט הוא יותר מאפס. הבעיה היא ש-assert בדרך כלל לא מספיק לי ואני רוצה עוד בדיקות, כמו לבדוק שטקסט מסוים מופיע באמצעות ביטוי רגולרי, או לוודא דברים אחרים, אני צריך משהו שהוא יותר מהבסיס. אחד המודולים האהובים והמומלצים הוא should.js שמאפשר לי לוודא דברים מאוד מתוחכמים על כל דבר, במיוחד פלט של HTML אבל לא רק. ההתקנה שלו היא פשוטה למדי:
npm install should --save-dev
לא נשכח כמובן לעשות לו require בקובץ הבדיקות. אחרי זה, אפשר פשוט לעיין בדוקומנטציה המאוד מורכבת שלו ולבחור את מה שמתאים. למשל:
var request = require('supertest'),
  app = require('../app.js'),
  should = require('should');

describe('help router', function(){ //Name of the tests collection
  it('GET about-me should return 200', function(done){ //Single test
    request(app) //Initiating the supertest with the app
      .get('/help/about-me')//Send GET to localhost:3000/help/about-me
      .expect('Content-Type', /html/)
      .expect(200)
      .end(function(err, res) {
        var text = res.text; //The response content, i.e. the HTML.
        text.length.should.be.above(0);
        text.should.containEql('Omri');
        text.should.containEql('Kfir');
        text.should.containEql('Daniel');
        text.should.containEql('Michal');
        done();
        if (err) throw err;
      });
  });
});
אני יכול להתוודות ש-should היתה מאוד לא חביבה עלי בהתחלה. הדוקומנטציה שלה מאוד מבלבלת ומרגיזה ולא תמיד הבנתי מה רוצים ממני. אבל אחרי שהתרגלתי, אני משתמש בעיקר בה לבדיקות. מומלץ מאוד.
מן הסתם אני לא אוכל לעבור פה על כל המתודות של should או של assert, אפילו לא אלו של supertest, מה שכן – במאמר הזה יש את כל הקישורים לדוקומנטציות השונות וכל מה שצריך לדעת זה שהמודולים האלו קיימים ולהסתכל על הדוגמאות. מפה והלאה, הבדיקות שתכתבו יהיו צריכות להיות תואמות לאפליקציה שלכם.
במאמר הבא אנו נדבר על test coverage ואיך בודקים אותו באפליקציה מבוססת express.


