לא מזמן יצא גם רספברי פיי 5 וגם שבב מיוחד שיכול להאיץ את הביצועים שלו עם AI. אבל ממש לא חייבים את השבב או את רספברי פיי 5 על מנת לעשות פרויקטים של בינה מלאכותית או למידת מכונה. למשל, הסברתי בפוסט קודם איך מתקינים LLM בסיסי ברספברי פיי.
בפוסט הזה אנו נלמד איך מתקינים מצלמה ומשתמשים במודול ראשוני לזיהוי פנים עם CV.
המצרכים:
- ידע והבנה ברספברי פיי – אם אין לכם – כדאי לקפוץ לפוסט הזה שידריך אתכם בנושא ממש מאפס ויוביל אתכם לפוסטים הבאים. צריך לדעת להתחבר ב-SSH לרספברי שלכם.
- רספברי פיי 3/4.
- מצלמה מסוג ov5647 – זה עולה 25 ש״ח בעלי אקספרס – זה הדגם שלי יש (קישור בלי affiliate כמובן, מה אני? משפיענית אינסטוש?).
- תקוות וחלומות.
התחברו אל הרספברי פיי ובצעו לו עדכון עם:
sudo apt-get update -y
sudo apt-get upgrade -y
התקינו את המצלמה – פה יש הסבר מעודכן על החיבור הפיזי והחומרתי. בצעו צילום כדי לוודא, זה באמת עניין של כ-5 דקות.
כדי שנוכל לעבוד על המצלמה מרחוק, אנו נתקין שתי תוכנות עזר:
sudo apt-get install xauth xorg -yועכשיו, כשיש לנו מצלמה עובדת – זה הזמן להתחיל! אנחנו נשתמש ב-openCV. ראשי תבות של Open Computer Vision – זו ספרית קוד פתוח מוכרת מאד וקלה מאד לשימוש כדי לזהות אובייקטים. נתקין את הגרסה הפייתונית שלה באמצעות:
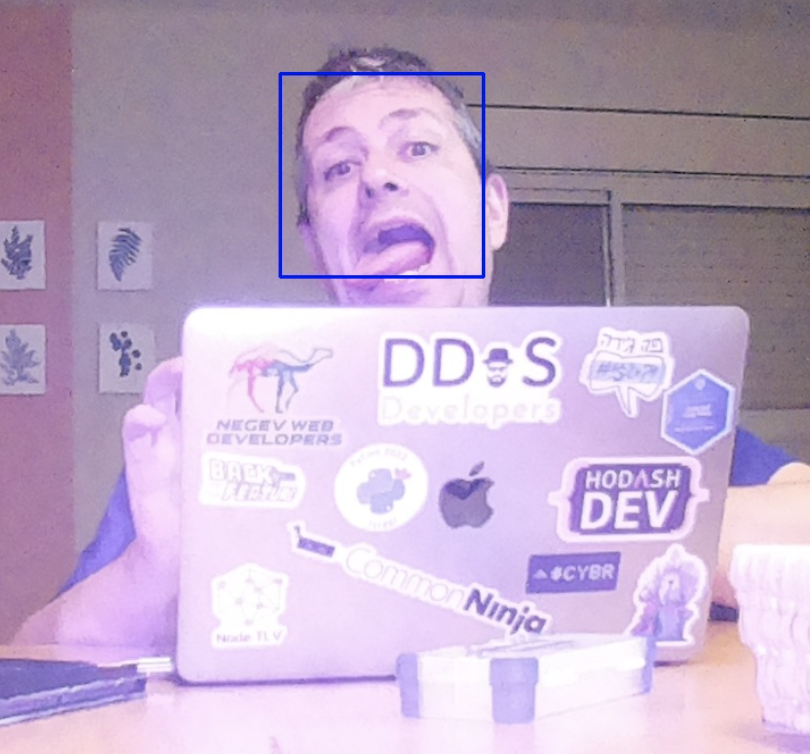
sudo apt-get install python3-opencvנכתוב קוד פייתון פשוט שמבצע בעצם צילום ואז זיהוי של פרצופים שיש בתמונה. ראשית, נוריד את Haar Cascade classifier. יש רשימה שלמה של כל מיני pre-trained model שלו פה. אפשר לבחור את מה שרוצים, אבל אני אשתמש בזיהוי פרצופים. אריץ את:
wget https://github.com/opencv/opencv/raw/master/data/haarcascades/haarcascade_frontalface_default.xmlואשים את ה-xml הזה בתיקית העבודה שלי, למשל
~/fc-projectעכשיו בואו וננסה את הקוד הזה:
import cv2
import subprocess

# Capture an image using libcamera-jpeg
capture_command = [
    'libcamera-jpeg',
    '-o', 'captured_image.jpg',
    '-t', '50',
    '--width', '1920',  # Set width to 1920 pixels
    '--height', '1080'  # Set height to 1080 pixels
]

subprocess.run(capture_command)

# Load the captured image
image_path = 'captured_image.jpg'
img = cv2.imread(image_path)

# Check if the image was successfully loaded
if img is None:
    print("Error: Could not load image.")
    exit()

# Convert the image to grayscale
gray_img = cv2.cvtColor(img, cv2.COLOR_BGR2GRAY)

# Load the Haar Cascade classifier for face detection
face_cascade = cv2.CascadeClassifier('haarcascade_frontalface_default.xml')

# Detect faces
faces = face_cascade.detectMultiScale(gray_img, scaleFactor=1.1, minNeighbors=5, minSize=(30, 30))

# Draw rectangles around the faces
for (x, y, w, h) in faces:
    cv2.rectangle(img, (x, y), (x+w, y+h), (255, 0, 0), 2)

# Save the result image
cv2.imwrite('captured_image_with_faces.jpg', img)

print("Face detection complete. Result image saved as 'captured_image_with_faces.jpg'.")
נשמור אותו ונריץ אותו עם python3 ואז שם הקובץ.
אם הכל כמו שצריך, אנו נראה בעצם שתי תמונות – זו שצולמה וזו שזוהו בה פרצופים!
עכשיו אפשר לקחת את זה למשהו יותר מעניין – למשל – בואו נבקש ממנו שיצלם כל כמה שניות – הוא זיהה בן אדם? שמור אותו ללוג!
import cv2
import subprocess
import time
import os
from datetime import datetime

# Create a directory for logs if it doesn't exist
log_dir = 'log'
os.makedirs(log_dir, exist_ok=True)

# Path to Haar Cascade file
cascade_path = 'haarcascade_frontalface_default.xml'
face_cascade = cv2.CascadeClassifier(cascade_path)

def capture_image():
    # Capture an image using libcamera-jpeg
    capture_command = [
        'libcamera-jpeg',
        '-o', 'captured_image.jpg',
        '-t', '500',  # Reduced time to 500 milliseconds
        '--width', '1920',  # Set width to 1920 pixels
        '--height', '1080'  # Set height to 1080 pixels
    ]

    # Run the capture command and redirect output to suppress it
    with open('/dev/null', 'w') as f:
        subprocess.run(capture_command, check=True, stdout=f, stderr=f)

def process_image():
    # Load the captured image
    image_path = 'captured_image.jpg'
    img = cv2.imread(image_path)

    # Check if the image was successfully loaded
    if img is None:
        print("Error: Could not load image.")
        return False

    # Convert the image to grayscale
    gray_img = cv2.cvtColor(img, cv2.COLOR_BGR2GRAY)

    # Detect faces
    faces = face_cascade.detectMultiScale(gray_img, scaleFactor=1.1, minNeighbors=5, minSize=(30, 30))

    # If faces are detected, save the image with a timestamp
    if len(faces) > 0:
        timestamp = datetime.now().strftime("%Y%m%d_%H%M%S")
        log_image_path = os.path.join(log_dir, f'face_detected_{timestamp}.jpg')
        cv2.imwrite(log_image_path, img)
        print(f"Face detected. Image saved as {log_image_path}.")
        return True
    else:
        print("No face detected.")
        return False

# Main loop to run every 5 seconds
while True:
    capture_image()
    process_image()
    time.sleep(5)
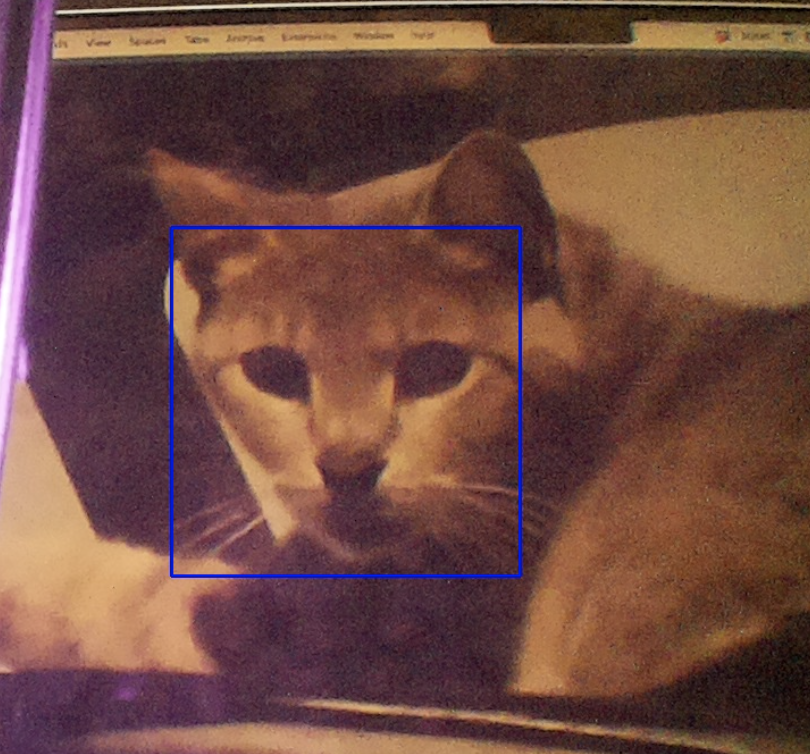
כמובן שאנחנו לא צריכים להסתפק בפרצופים בלבד – למה שלא נזהה… חתולים? כך למשל נוכל להפעיל באזר כשהחתול מתקרב אלינו כדי להזהיר אותנו שהולך להיות פה איזה נזק.
נוריד את ה pre trained של החתולים מפה:
wget https://github.com/opencv/opencv/raw/master/data/haarcascades/haarcascade_frontalcatface.xml
ופשוט נזהה את החתול. אם אין לכם חתול או החתול לא משתף פעולה, אפשר להשתמש בתמונה של חתול 🙂
import cv2
import subprocess
import os
import time
from datetime import datetime

# Path to Haar Cascade file for cat detection
cascade_path = 'haarcascade_frontalcatface.xml'
cat_cascade = cv2.CascadeClassifier(cascade_path)

# Create a directory for logs if it doesn't exist
log_dir = 'cat_log'
os.makedirs(log_dir, exist_ok=True)

def capture_image():
    # Capture an image using libcamera-jpeg with higher resolution and shorter capture time
    capture_command = [
        'libcamera-jpeg',
        '-o', 'captured_image.jpg',
        '-t', '500',  # Reduced time to 500 milliseconds
        '--width', '1920',  # Set width to 1920 pixels
        '--height', '1080'  # Set height to 1080 pixels
    ]

    # Run the capture command and redirect output to suppress it
    with open('/dev/null', 'w') as f:
        subprocess.run(capture_command, check=True, stdout=f, stderr=f)

def process_image():
    # Load the captured image
    image_path = 'captured_image.jpg'
    img = cv2.imread(image_path)

    # Check if the image was successfully loaded
    if img is None:
        print("Error: Could not load image.")
        return False

    # Convert the image to grayscale
    gray_img = cv2.cvtColor(img, cv2.COLOR_BGR2GRAY)

    # Detect cats
    cats = cat_cascade.detectMultiScale(gray_img, scaleFactor=1.1, minNeighbors=5, minSize=(30, 30))

    # If cats are detected, save the image with a timestamp
    if len(cats) > 0:
        for (x, y, w, h) in cats:
            cv2.rectangle(img, (x, y), (x+w, y+h), (255, 0, 0), 2)

        timestamp = datetime.now().strftime("%Y%m%d_%H%M%S")
        log_image_path = os.path.join(log_dir, f'cat_detected_{timestamp}.jpg')
        cv2.imwrite(log_image_path, img)
        print(f"Cat detected. Image saved as {log_image_path}.")
        return True
    else:
        print("No cat detected.")
        return False

# Main loop to run every 5 seconds
while True:
    capture_image()
    process_image()
    time.sleep(5)
או קיי, זה בוודאי פותח את התאבון ומראה כמה זה קל. אפשר לקחת את זה צעד אחד קדימה לכיוון של ספריות קצת יותר פופולריות כמו tensorflow שמצריכות הכרות יותר מעמיקה עם פייתון או אימון מודל שיזהה את הפרצוף שלי! וכמובן שהכיף האמיתי מתחיל עם ESP32 שאולי יעביר לנו את התמונות מרחוק, אבל את זה נעשה בפוסט הבא.


3 תגובות
מצוין. יש סיכוי למדריך מצולם? יקל מאוד על מתחילים
איך זה מתממשק ל home assistant אם בכלל ?
פוסט נחמד מאוד!
האם זז כבד מדי מכדי שירוץ על RPi זול יותר?
פאי זירו לדוגמא?