המילה החמה בפיתוח תוכנה, בטח כשמדברים על פיתוח תוכנה מבוססת קוד פתוח הוא Continuous integration או בקיצור CI. כשמדברים על CI מתכוונים שברגע שכותבים קוד מכניסים אותו מייד לענף הראשי של הגרסה או של המוצר. כאשר אנו מדברים על CI בדרך כלל מדברים גם על CD שזה ראשי תיבות של Continuous deployment שזה אומר שלא רק שהענף הראשי של הגרסה מתעדכן באופן תכוף, אלא הוא גם יוצא לפרודקשן כמעט מייד.
גישת CI\CD נשענת באופן כבד ביותר על בדיקות אוטומטיות. כשמשחררים גרסה פעם ביום, וכמעט כל קוד שהמפתח כותב נכנס לשימוש כמעט מייד – אין ברירה אלא להשתמש בהמון בדיקות אוטומטיות מכמה סוגים. כאשר יש לא מעט שירותים ותוכנות שתפקידן להריץ את הבדיקות האוטומטיות. Jenkins הוא הדוגמה הטובה ביותר לתוכנה הפופולרית ביותר. אבל יש גם אחרים.
תחום הקוד הפתוח מוביל את תחום ה-CI\CD ואחד מהשירותים הפופולריים שמשלים את GitHub הוא Travis CI – שירות שמאפשר הרמה מיידית של סביבת בדיקות מורכבת, התקנה של סביבת הבדיקות, הרצת הבדיקות וכל זה בדקות (לפעמים גם שניות) ספורות. לא מעט פרויקטים, במיוחד בתחום Node.js אבל לא רק, משתמשים באינטגרציה עם Travis CI. אם יצא לכם לעשות pull request בשנים האחרונות ב-GitHub, בוודאי ראיתם שלכל Pull request מתלווה הרצת בדיקות אוטומטית עם Travis.
וורדפרס ברובו זה ענף של חאפרים, אבל גם בוורדפרס יש מגמה הולכת וגוברת של מעבר לבדיקות אוטומטיות כאשר מפתחים מובילים (גם בארץ! ומי שכותב יודע שאני יודע שהוא כותב) בונים את התוספים והתבניות שלהם כאשר יש בהן בדיקות אוטומטיות. אם אתם כותבים תוספים לגיטהאב, וכותבים גם בדיקות אוטומטיות, אין שום סיבה שלא לעשות אינטרגרציה עם Travis CI וכך בעצם לבצע בדיקות אוטומטיות במגוון סביבות בכל פעם שיש pull request. לא רק שזה מקל על מי שירצה לתרום קוד לפרויקט שלכם, אלא גם זה מקל עליכם לבצע את הבדיקות האוטומטיות על מגוון סביבות בקלות. כך למשל, אני יכול להריץ את הבדיקות האוטומטיות על אחד התוספים שלי על מחשבים עם PHP מגרסה 5.4, 5.5 או גרסה 5.6. ויש מוצרים שזה חשוב עבורם.
האמת היא שזה כל כך קל לבצע אינטגרציה, שזו בדיחה. אני נעזרתי בפרויקט של Seravo שמסביר איך לעשות את זה ועל בסיס הפרויקט שלו ביצעתי את האינטגרציה שלי. מי שרוצה לראות שידור חי, מוזמן לתוסף rtl-feed-fixer שלי שגם פותר בעיה מציקה לאתרי וורדפרס בשפות מימין לשמאל וגם נשען על כמה וכמה בדיקות אוטומטיות שרצות עם Travis CI.
הדבר הראשון הוא יצירת קובץ travis.yml. (נקודה בהתחלה). הקובץ הוא די פשוט
# This uses newer and faster docker based build system
sudo: false

language: php

notifications:
  on_success: never
  on_failure: change

php:
  - nightly # PHP 7.0
  - 5.6
  - 5.5
  - 5.4

env:
  - WP_PROJECT_TYPE=plugin WP_VERSION=latest WP_MULTISITE=0 WP_TEST_URL=http://localhost:12000 WP_TEST_USER=test WP_TEST_USER_PASS=test

matrix:
  allow_failures:
    - php: nightly

before_script:
  # Install composer packages before trying to activate themes or plugins
  # - composer install

  - git clone https://github.com/YOUR_GITHUB_PLUGIN_WP wp-tests
  - bash wp-tests/bin/install-wp-tests.sh test root '' localhost $WP_VERSION

script:
  - phpunit
  - cd tests/spec && bundle exec rspec test.rb
כאשר מה שאתם צריכים לעשות זה להחליף את https://github.com/YOUR_GITHUB_PLUGIN_WP בקישור לפרויקט שלכם. אם תבחנו את הקובץ תראו שהוא מפרט גם את גרסאות ה-PHP שעליהן אנו מריצים את הבדיקות: 5.4, 5.5, 5.6 וגם את 7, אך אם הבדיקה תיפול ב-7 זה לא יכשיל את הבילד.
בנוסף, אנו מריצים את tests/bin/install-wp-tests.sh
את הקובץ הזה אנו דואגים להציב בתיקית הבדיקות שלנו. חשוב לוודא שהנתיב יהיה מתאים! אם במקרה הבדיקות שלכם יושבות ב: ahla-bahla-tests. אז תפתחו תיקית bin שם ותכתבו:
– bash ahla-bahla-tests/bin/install-wp-tests.sh test root " localhost $WP_VERSION
עכשיו כל מה שנותר לנו לעשות זה ליצור את install-wp-tests.sh שהוא קובץ BASH חביב שמריץ את הבדיקות ממש:
#!/usr/bin/env bash
##
# This script installs wordpress for phpunit tests and rspec integration tests
##
DIR=$( cd "$( dirname "${BASH_SOURCE[0]}" )" && pwd )
DIR=$(dirname ${DIR})

if [ $# -lt 3 ]; then
echo "usage: $0    [db-host] [wp-version]"
exit 1
fi

DB_NAME=$1
DB_USER=$2
DB_PASS=$3
DB_HOST=${4-localhost}

WP_VERSION=${5-latest}

# Use this for installing wordpress siteurl
WP_TEST_URL=${WP_TEST_URL-http://localhost:12000}

# Get port from url
WP_PORT=${WP_TEST_URL##*:}

WP_TESTS_DIR=${WP_TESTS_DIR-/tmp/wordpress-tests-lib/includes}
WP_CORE_DIR=${WP_CORE_DIR-/tmp/wordpress/}

# Use these credentials for installing wordpress
# Default test/test
WP_TEST_USER=${WP_TEST_USER-test}
WP_TEST_USER_PASS=${WP_TEST_USER_PASS-test}

set -ex

download() {
  if [ `which curl` ]; then
    curl -s "$1" > "$2";
  elif [ `which wget` ]; then
    wget -nv -O "$2" "$1"
  fi
}

install_wp() {
  if [ -d $WP_CORE_DIR ]; then
    return;
  fi

  mkdir -p $WP_CORE_DIR

  if [ $WP_VERSION == 'latest' ]; then
    local ARCHIVE_NAME='latest'
  else
    local ARCHIVE_NAME="wordpress-$WP_VERSION"
  fi

  download https://wordpress.org/${ARCHIVE_NAME}.tar.gz  /tmp/wordpress.tar.gz
  tar --strip-components=1 -zxmf /tmp/wordpress.tar.gz -C $WP_CORE_DIR

  download https://raw.github.com/markoheijnen/wp-mysqli/master/db.php $WP_CORE_DIR/wp-content/db.php
}

install_test_suite() {
  # portable in-place argument for both GNU sed and Mac OSX sed
  if [[ $(uname -s) == 'Darwin' ]]; then
    local ioption='-i .bak'
  else
    local ioption='-i'
  fi

  # set up testing suite if it doesn't yet exist
  if [ ! "$(ls -A $WP_TESTS_DIR)" ]; then
    # set up testing suite
    mkdir -p $WP_TESTS_DIR
    svn co --quiet http://develop.svn.wordpress.org/trunk/tests/phpunit/includes/ $WP_TESTS_DIR
  fi

  cd $WP_TESTS_DIR

  # Install barebone wp-tests-config.php which is faster for unit tests
  if [ ! -f wp-tests-config.php ]; then
    download https://develop.svn.wordpress.org/trunk/wp-tests-config-sample.php $(dirname ${WP_TESTS_DIR})/wp-tests-config.php
    sed $ioption "s:dirname( __FILE__ ) . '/src/':'$WP_CORE_DIR':" $(dirname ${WP_TESTS_DIR})/wp-tests-config.php
    sed $ioption "s/youremptytestdbnamehere/$DB_NAME/" $(dirname ${WP_TESTS_DIR})/wp-tests-config.php
    sed $ioption "s/yourusernamehere/$DB_USER/" $(dirname ${WP_TESTS_DIR})/wp-tests-config.php
    sed $ioption "s/yourpasswordhere/$DB_PASS/" $(dirname ${WP_TESTS_DIR})/wp-tests-config.php
    sed $ioption "s|localhost|${DB_HOST}|" $(dirname ${WP_TESTS_DIR})/wp-tests-config.php
  fi

  # Install real wp-config.php too
  cd $WP_CORE_DIR

  if [ ! -f wp-config.php ]; then
    mv wp-config-sample.php wp-config.php
    sed $ioption "s/database_name_here/$DB_NAME/" $WP_CORE_DIR/wp-config.php
    sed $ioption "s/username_here/$DB_USER/" $WP_CORE_DIR/wp-config.php
    sed $ioption "s/password_here/$DB_PASS/" $WP_CORE_DIR/wp-config.php
    sed $ioption "s|localhost|${DB_HOST}|" $WP_CORE_DIR/wp-config.php
    # Use different prefix for integration tests
    sed $ioption "s|^.*\$table_prefix.*$|\$table_prefix  = 'integ_';|" $WP_CORE_DIR/wp-config.php
  fi
}

install_db() {
  # parse DB_HOST for port or socket references
  local PARTS=(${DB_HOST//\:/ })
  local DB_HOSTNAME=${PARTS[0]};
  local DB_SOCK_OR_PORT=${PARTS[1]};
  local EXTRA=""

  if ! [ -z $DB_HOSTNAME ] ; then
    if [ $(echo $DB_SOCK_OR_PORT | grep -e '^[0-9]\{1,\}$') ]; then
      EXTRA="--host=$DB_HOSTNAME --port=$DB_SOCK_OR_PORT --protocol=tcp"
    elif ! [ -z $DB_SOCK_OR_PORT ] ; then
      EXTRA="--socket=$DB_SOCK_OR_PORT"
    elif ! [ -z $DB_HOSTNAME ] ; then
      EXTRA="--host=$DB_HOSTNAME --protocol=tcp"
    fi
  fi

  # create database
  mysqladmin create $DB_NAME --user="$DB_USER" --password="$DB_PASS" $EXTRA
}

link_this_project() {
  cd $DIR
  local FOLDER_PATH=$(dirname $DIR)
  local FOLDER_NAME=$(basename $FOLDER_PATH)
  case $WP_PROJECT_TYPE in
    'plugin' )
        ln -s $FOLDER_PATH $WP_CORE_DIR/wp-content/plugins/$FOLDER_NAME
        php wp-cli.phar plugin activate --all --path=$WP_CORE_DIR
        ;;
    'theme' )
        ln -s $FOLDER_PATH $WP_CORE_DIR/wp-content/themes/$FOLDER_NAME
        php wp-cli.phar theme activate $FOLDER_NAME --path=$WP_CORE_DIR
        ;;
  esac
}

# Install databases with wp-cli
install_real_wp() {
  cd $DIR
  download https://raw.githubusercontent.com/wp-cli/builds/gh-pages/phar/wp-cli.phar wp-cli.phar
  php wp-cli.phar core install  --url=$WP_TEST_URL --title='Test' --admin_user=$WP_TEST_USER --admin_password=$WP_TEST_USER_PASS --admin_email="[email protected]" --path=$WP_CORE_DIR
}

install_rspec_requirements() {
  gem install bundler
  bundle install --gemfile=$DIR/spec/Gemfile
}

start_server() {
  mv $DIR/bin/router.php $WP_CORE_DIR/router.php
  cd $WP_CORE_DIR
  # Start it in background
  php -S 0.0.0.0:$WP_PORT router.php &
}

install_wp
install_test_suite
install_db
install_real_wp
link_this_project
# install_rspec_requirements
start_server
מה שהקובץ החביב עושה הוא התקנת סביבת בדיקות של וורדפרס והכנתה לבדיקות. זה די דומה לפרויקט של Seravo אבל אני ניטרלתי את כל עניין הרובי כי אין לי את זה בפרויקטים שלי. במידה ויש לכם רובי, תדאגו שיהיה לכם ruby gem file ותעיפו את ההערה מ: install_rspec_requirements.
בנוסף, דאגתי שבאותה תיקיה יהיה את קובץ router.php:
<?php
/*
 * This is router for built-in php server. It is designed to use only for testing
 * This frees us from installing apache or nginx in travis
 * Usage: $ php -S 0.0.0.0:12000 router.php
 */

$root = $_SERVER['DOCUMENT_ROOT'];

$path = '/'. ltrim( parse_url( urldecode( $_SERVER['REQUEST_URI'] ) )['path'], '/' );

$requestfile = NULL;

// Search for request file
if(file_exists( $root.$path )) {
    $requestfile = $root.$path;
} else {
    // Check if wordpress core is installed in subdirectory by searching files in one subdirectory below
    // This makes it work with composer installed wordpress too
    foreach(scandir($root) as $file) {
        if($file == '.' || $file == '..') continue;
        $filename = '/'.$file.$path;
        if(file_exists( $root.$filename )) {

            // Check if assets are in subfolder
            if (preg_match('/\.(?:png|jpg|jpeg|gif|css|js|svg|min|ttf|swf|xml)$/', $_SERVER["SCRIPT_NAME"])) {
                // We can't rewrite assets but we can redirect them
                header("Location: $filename");
                exit();
            }
            $requestfile = $root.$filename;
            break;
        }
    }
}

// In testing environment use whatever we get as hostname
define('WP_HOME',    'http://'.$_SERVER['HTTP_HOST']);
define('WP_SITEURL', 'http://'.$_SERVER['HTTP_HOST']);

// We can't use https in travis
define('FORCE_SSL_ADMIN', false);

if ( $requestfile ) {
    if ( is_dir( $requestfile ) && substr( $path, -1 ) !== '/' ) {
        header( "Location: $path/" );
        exit;
    }
    if ( strpos( $path, '.php' ) !== false ) {
        chdir( dirname( $requestfile ) );
        require_once basename($requestfile); // If file exists just use it!
    } elseif(is_dir($requestfile)) {
        chdir( dirname( $requestfile ) );
        require_once 'index.php'; // If this was a folder use index.php instead
    } else {
        return false; // This just means to return file as is
    }
} else {
    chdir( $root );
    require_once 'index.php';
}
הוא חוסך לנו התקנה של Apache.
כל מה שנותר הוא לוודא שה-bootstrap.php עובד כמו שצריך. קחו את הקובץ הזה ותחליפו את your-plugin-name.php.
<?php

$_tests_dir = getenv( 'WP_TESTS_DIR' );
if ( ! $_tests_dir ) {
	$_tests_dir = '/tmp/wordpress-tests-lib';
}

define('PLUGIN_NAME','your-plugin-name.php');
define('PLUGIN_FOLDER',basename(dirname( __DIR__ )));
define('PLUGIN_PATH',PLUGIN_FOLDER.'/'.PLUGIN_NAME);

// Activates this plugin in WordPress so it can be tested.
$GLOBALS['wp_tests_options'] = array(
	'active_plugins' => array( PLUGIN_PATH ),
);

require_once $_tests_dir . '/includes/functions.php';

function _manually_load_plugin() {
	require dirname( __DIR__ ) . '/'.PLUGIN_NAME;
}

tests_add_filter( 'muplugins_loaded', '_manually_load_plugin' );

require $_tests_dir . '/includes/bootstrap.php';
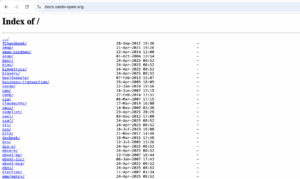
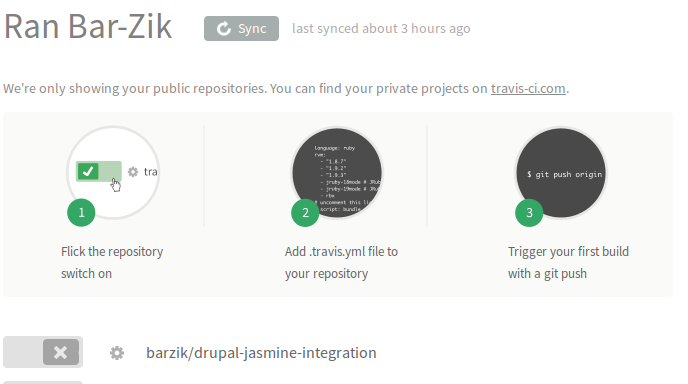
מהנקודה הזו זה ממש קל. כל מה שצריך זה להרשם באתר של Travis CIולחבר את חשבון הגיטהאב שלכם עם האתר. אחרי כן, יש להשתמש בממשק הגרפי המאוד נוח של האתר ולבחור את הפרויקטים שאתם רוצים להפעיל בהם את travis:
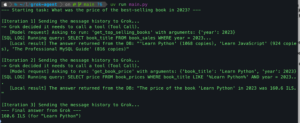
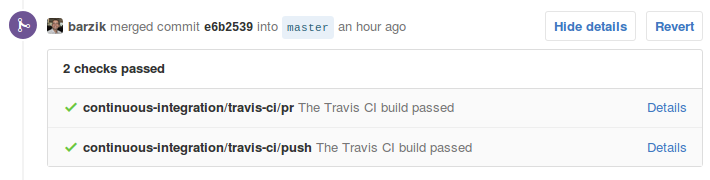
זה הכל! כל pull request יריץ את הבדיקות האוטומטיות באופן מיידי. אם אתם התורמים, תצטרכו לעשות pull request לעצמכם ולהתגבר על הפיתוי לעשות אישור לפני שתוצאות הבדיקות יגיעו. אם הכל יהיה תקין, תקבלו הודעה. אם תהיה בעיה, תוכלו לראות את לוג הבדיקות. לא צריך להבהל מהלוג, מדובר בתדפיס קונסולה ובדרך כלל קל לראות מה השתבש ואיזו בדיקה נפלה.