אתם מגיעים הביתה אחרי יום עמוס ועיניכם חושכות: הכיור מפוצץ בכלים שהילדים לא טרחו לנקות כי למה לא. כשאתם קוראים לצאצאים ודורשים הסברים הם מייד אומרים ״שכחתי״. אז… למה שלא נרתום את כוח ה-AI וה-IoT כדי להזכיר להם?
אפשר לעשות את זה בקלות והשמחה היא רבה מאד. אולי פחות של הילדים, אבל בטח שלכם. וזה גם פרויקט שאפשר להעתיק אותו בקלות אל סל הכביסה הנקיה למשל, חדר נקי או מלוכלך או קופסת החול של החתול. השמים הם הגבול!
פוסט זה מצריך ידע מוקדם – הנה הפוסטים הרלוונטיים שצריך להכיר:
מה זה רספברי פיי ואיך מתחברים אליו ב-SSH ואיך מחברים אליו רמקול בלוטות׳.
מה זה ESP32 ואיך מחברים אליו מצלמה.
פרוטוקול MQTT לתקשורת בין ESP32 לרספברי פיי.
יצירת image classification עם teachablemachine ודיפלוט אל רספברי פיי.
זה נראה כמו סילבוס של קורס לתואר שני אבל באמת זה לא נורא בכלל! ???? זו באמת מערכת מורכבת שכדי לבנות אותה צריך ידע מקדים. אבל זה ידע שקל (ויותר חשוב: כיף) לרכוש. אז אם אתם לא מכירים, קפיצה קטנה לפוסטים השונים בהחלט תסייע.
מכירים את הכל? אז בואו ונתחיל לתכנן. יש לנו שלושה רכיבים עיקריים:
רספברי פיי שמחובר לבלוטות׳ שהוא המוח של המערכת ומקבל את ההודעות ופועל בהתאם. הפלט שלו הוא פלט קולי.
ESP32-CAM שמצלם את התמונות ושולח אותן אל המוח.
רמקול בלוטות׳, כי צריך מישהו או משהו שיצרח.
בגדול, כך נראה התכנון ממבט על:
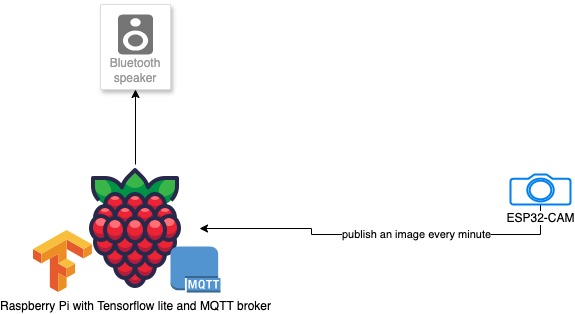
זרם המידע הוא:
תמונה מגיעה מה-ESP32 עם MQTT אל הרספברי פיי כל דקה. הרספבריי פיי מנתח אותה. אם הכיור ריק? מעולה לא קורה כלום. אם הכיור מלא? הוא שולח זעקה אל הבלוטות׳. הוא ימשיך לעשות כן כל עוד לא התקבלה תמונה שהניתוח שלה העלה שהיא כיור ריק. במקרה הזה תוצג הודעת הרגעה והמצב יחזור למצב ההתחלתי.
עבודה עם ESP32
ראשית, נצרוב image התומך במצלמה אל ה-ESP32 ונתקין עליו MQTT דרייבר של מיקרופייתון. זה בעצם קובץ אחד ששמים ב-ESP32.
ב-boot.py נכניס התחברות אל הרשת וכן sleep קטן. כדי שיהיה סדר. החליפו את ה-YOUR_SSID ואת ה-YOUR_PASSWORD בסיסמה ושם המשתמש של הויי פיי שלכם.
# This file is executed on every boot (including wake-boot from deepsleep)
#import esp
#esp.osdebug(None)
#import webrepl
#webrepl.start()
import network
import time

SSID = 'YOUR_SSID'
PASSWORD = 'YOUR_PASSWORD'

def connect_wifi(ssid, password):
    wlan = network.WLAN(network.STA_IF)
    wlan.active(True)
    if not wlan.isconnected():
        print('Connecting to network...')
        wlan.connect(ssid, password)
        while not wlan.isconnected():
            time.sleep(1)  # Retry every second
            print('Trying to connect...')
    print('Connected. Network config:', wlan.ifconfig())

# Call the Wi-Fi connection function
connect_wifi(SSID, PASSWORD)
print("Boot sleep for 2 seconds")
time.sleep(2)
print("Boot finished")
זה יבטיח שתמיד יהיה חיבור לרשת. החלק השני הוא ב-main.py, שם יש קוד שמצלם כל דקה ושולח את התמונה ל-IP של הרספברי פיי. החליפו את YOUR_RPI_IP ב-IP שלכם. הוא שולח ב-MQTT עם הנושא: esp32/cam/image
import time
import camera
from umqttsimple import MQTTClient

# MQTT settings
MQTT_BROKER = 'YOUR_RPI_IP'  # Replace with your MQTT broker IP
MQTT_TOPIC = 'esp32/cam/image'

# Initialize the camera
def init_camera():
    camera.init()

    # Use numeric value for QVGA (320x240) or other frame sizes
    camera.framesize(7)  # 2 corresponds to QVGA (320x240)
    camera.quality(0)   # Adjust the image quality (0-63, lower is higher quality)
    print("Camera initialized with QVGA frame size")

# Connect to the MQTT broker
def connect_mqtt():
    client = MQTTClient("esp32-cam", MQTT_BROKER)

    # Attempt to connect to the MQTT broker
    connected = False
    while not connected:
        try:
            client.connect()
            connected = True
            print("Connected to MQTT broker")
        except OSError as e:
            print(f"Failed to connect to MQTT broker: {e}")
            print("Retrying in 5 seconds...")
            time.sleep(5)  # Wait before retrying
    return client

# Capture an image and publish it via MQTT
def capture_and_publish(client):
    img = camera.capture()
    if img:
        print("Image captured")
        client.publish(MQTT_TOPIC, img)  # Publish image as binary payload
        print(f"Image published to {MQTT_TOPIC}")
    else:
        print("Failed to capture image")

# Main loop
def main():
    init_camera()
    client = connect_mqtt()

    while True:
        capture_and_publish(client)
        time.sleep(60)  # Wait for 1 minute before the next capture

# Run the main function
if __name__ == '__main__':
    main()
בדיקה של ESP32
מאד כדאי לבדוק שהכל מנגן בשלב הזה ואין שגיאות מלבד השגיאה Failed to connect to MQTT broker: שהיא מאד מובנת כי עדיין לא בנינו אותו. אבל לראות שבאמת המצלמה עובדת, שאין שגיאות מוזרות. במידה ויש שגיאות אז:
- ריסטארט – זה תמיד עוזר.
- נסו לעבוד מתודי – שימו לב שצ׳אטGPT ושאר LLMים לא תמיד יעזרו ויכולים לשגר אתכם במורד מחילת ארנב של התקנות ובלגן. שימו לב איפה התקלה מתרחשת – זה בגלל שהפורמט של המצלמה אולי לא תואם את המצלמה שלכם יש? הוא מחובר לרשת? יכול להיות שהרשת היא ב-5Ghz וזה לא מתאים לו?
התקנת MQTT לרספברי פיי ובדיקה
זה השלב שבו אנו נתקין MQTT broker לרספברי פיי ונבדוק אותו בדיוק כפי שתיארתי במאמר על MQTT. פיתחו שני טרמינלים וכיתבו בראשון אחד שעושה subscribe ל-topic:
mosquitto_sub -h localhost -t test/topic
ובשני תבצעו publish ל-topic:
mosquitto_pub -h localhost -t test/topic -m "Hello, MQTT!"עובד? מעולה. אפשר להתקדם. ניצור תיקיה וניצור שם פרויקט פייתוני למהדרין באמצעות:
python3 -m venv .מתוך תיקית הפרויקט. אחרי כן נכנס לסביבה הוירטואלית באמצעות:
source venv/bin/activateכתבתי על הסביבה הוירטואלית בפייתון בפוסט הקודם וגם בפוסט על pip + venv – אבל אם אתם לא מכירים זה בסדר – כל מה שצריך לזכור ולדעת שמדובר פשוט בדרך של פייתון לבודד את הסביבה המקומית של הפיתוח מהגלובלית וחובה להפעיל את זה לפני שמריצים קוד פייתון מהפרויקט שלנו.
כשאנחנו בתוך הסביבה הוירטואלית, נתקין את paho שיעזור לנו להרשם לנושא ב-MQTT:
pip install paho-mqtt
עכשיו, ננסה לקלוט את התמונה מה-ESP32-CAM. זה החלק הכי עדין של האינטגרציה בין המערכות. ניצור קובץ בשם image_saver.py ונכניס אליו את התוכן הזה:
import os
import time
import paho.mqtt.client as mqtt
# Directory to save images
IMAGE_DIR = "images"
if not os.path.exists(IMAGE_DIR):
os.makedirs(IMAGE_DIR)
# MQTT Settings
MQTT_BROKER = "localhost" # Change if your Mosquitto broker is running on another machine
MQTT_PORT = 1883
MQTT_TOPIC = "esp32/cam/image"
# Callback when a message is received
def on_message(client, userdata, message):
print("Image received!")
try:
# Save the binary image data to a file
img_filename = os.path.join(IMAGE_DIR, f"image_{int(time.time())}.jpg")
with open(img_filename, 'wb') as img_file:
img_file.write(message.payload)
print(f"Image saved as {img_filename}")
except Exception as e:
print(f"Failed to save image: {e}")
# Set up MQTT client and connect to the broker using MQTT version 5
def setup_mqtt_client():
client = mqtt.Client(protocol=mqtt.MQTTv5) # Use MQTT version 5
# Attach the on_message callback to handle incoming messages
client.on_message = on_message
# Connect to the broker
client.connect(MQTT_BROKER, MQTT_PORT, 60)
# Subscribe to the topic
client.subscribe(MQTT_TOPIC)
return client
if __name__ == "__main__":
# Set up the client and start the loop
client = setup_mqtt_client()
print(f"Subscribed to {MQTT_TOPIC}, waiting for images...")
# Blocking loop to process MQTT messages
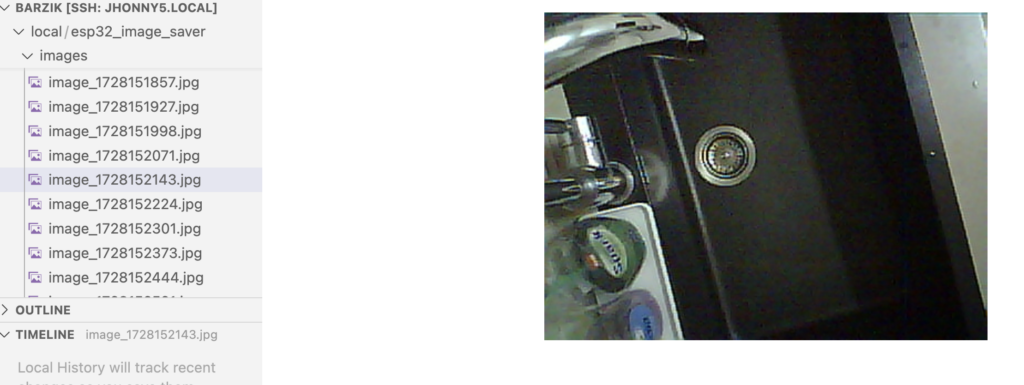
client.loop_forever()נשמור ונריץ עם py image_saver.py – מהשלב הזה – כל דקה אנחנו אמורים לראות תמונה שנשמרת אצלנו ברספברי פיי. אם אתם מחוברים עם vscode – זה קל לבדוק את התמונות.
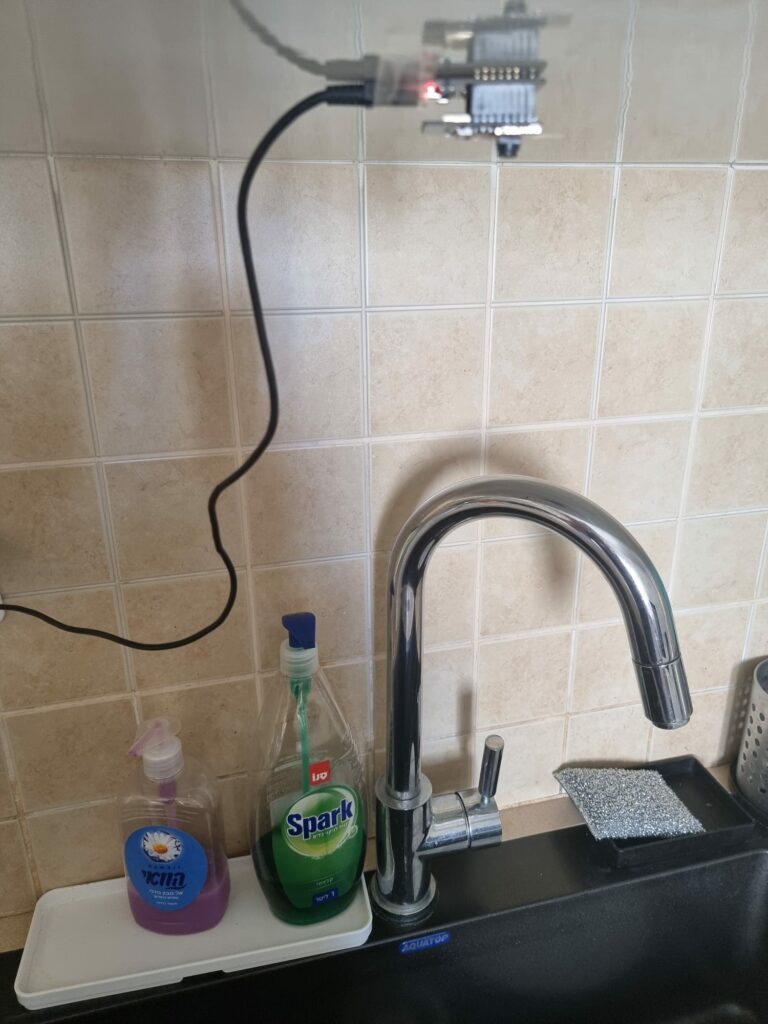
מיקום ה-ESP32 במקום המתאים
נחבר את ה-ESP32 למקום שבו אנחנו רוצים שהוא יהיה המקום הסופי. במקרה שלי זה מעל הכיור. אבל זה יכול להיות בכל מקום אחר – אם אתם מנטרים את סל הכביסה – אז עדיף שם. למה זה חשוב? כי עכשיו הוא שומר תמונה כל דקה ואנו נשתמש בתמונות האלו לאימון המודל. אני למשל כל דקה הכנסתי א�� הוצאתי כלים מהכיור. היו לי תמונות שלו מלא, מלא חלקית ומפוצץ. לא צריך המון תמונות. אגרתי כ-20 בערך.
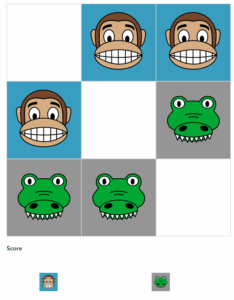
אימון המודל ב-teachablemachine
עם התמונות האלו, ניגש לteachablemachine וניצור מודל. למדנו על כך בפוסט הקודם. מדובר בדרך גרפית ונעימה ליצור מודלים של ML. במקרה שלי אני אצור סיווג של שני מצבים: כיור מלא וכיור ריק. אתן להם שמות באנגלית כמובן.
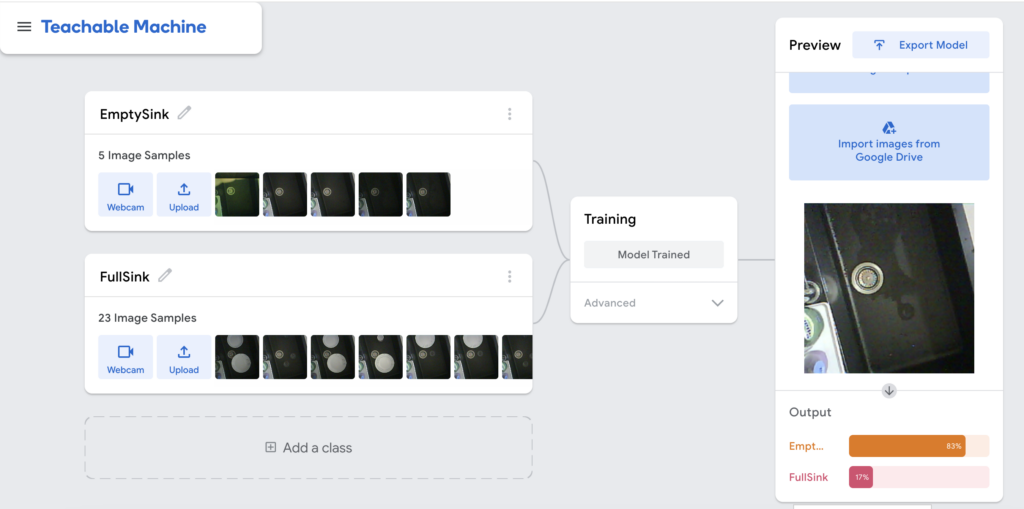
מומלץ לבדוק את המודל עם תמונות אחרות. כאמור יש לכם כל דקה תמונה, נצלו את זה 🙂 אני הפעלתי את זה יום שלם מעל הכיור גם בסוגי תאורה שונים.
אחרי שאתם מרוצים מהתוצאה. יצאו את המודל כ Tensorflow lite float 32. ירד זיפ שיש בו שני קבצים – אחד מהם הוא בסיומת tflite והשני הוא labels.txt.
אנו נעתיק את שני הקבצים לתיקית models בפרויקט שלנו וניגש לעבודה.
ניתוח התמונות שמגיע מה-ESP32
ראשית נחבר את הרמקול שלנו ל-ESP32 ונוודא שהוא עובד באמצעות aplay. נתקין גם espeak שהוא מודול text to speech פשוט באמצעות הקלדה של הטרמינל.
sudo apt-get install espeak -yבדיקת המודל
אני ממליץ בחום רב לבדוק את המודל לפני האינטגרציה. קחו שתי תמונות מייצגות, בידקו אותם ב-teachablemachine כדי לוודא שהמודל עובד נכון. ניצור בפרויקט debug_tflite_model.py ונכניס לתוכו קוד שטוען את ה-tflite שלנו ומחזיר לנו את המידע:
import numpy as np
from PIL import Image, ImageOps
import tflite_runtime.interpreter as tflite

# Disable scientific notation for clarity
np.set_printoptions(suppress=True)

# Load the TFLite model and allocate tensors
model_path = "models/kitchen_sink_detector.tflite"  # Update with your TFLite model path
interpreter = tflite.Interpreter(model_path=model_path)
interpreter.allocate_tensors()

# Get input and output tensor details
input_details = interpreter.get_input_details()
output_details = interpreter.get_output_details()

# Load the labels
with open("models/labels.txt", "r") as f:
    class_names = [line.strip() for line in f.readlines()]

# Create the array of the right shape to feed into the model
# Get the input shape from the model's input details
input_shape = input_details[0]['shape']  # e.g., [1, 224, 224, 3]

# Replace this with the path to your image
image_path = "images/full_sink.jpg"  # Update with your image path
image = Image.open(image_path).convert("RGB")

# Resize the image to the expected input size using LANCZOS resampling
size = (input_shape[1], input_shape[2])  # (width, height)
image = ImageOps.fit(image, size, Image.Resampling.LANCZOS)

# Convert the image to a numpy array
image_array = np.asarray(image)

# Normalize the image as per the model's requirements
normalized_image_array = (image_array.astype(np.float32) / 127.5) - 1.0  # Scale to [-1, 1]

# Expand dimensions to match the model's input shape
input_data = np.expand_dims(normalized_image_array, axis=0)  # Shape: (1, height, width, 3)

# Set the tensor to point to the input data
interpreter.set_tensor(input_details[0]['index'], input_data)

# Run the inference
interpreter.invoke()

# Retrieve the output from the model
output_data = interpreter.get_tensor(output_details[0]['index'])  # Shape: (1, num_classes)

# Get the index of the highest confidence score
index = np.argmax(output_data)
class_name = class_names[index]
confidence_score = output_data[0][index]

# Print prediction and confidence score
print("Class:", class_name)
print("Confidence Score:", confidence_score)
כדי להריץ אותו, אנו צריכים להתקין שלושה מודולים:
pip install numpy
pip install pillow
pip install tflite-runtime
אל תשכחו להתקין אותם כשאתם בתוך הסביבה הוירטואלית! אחרי ההתקנה, יש להריץ את הקוד באמצעות python debug_tflite_model.py.
העבודה המתודית תעזור לנו להבין את השגיאות לפני שאנחנו מחברים את האינטגרציה של הכל. אם הקוד הזה לא עובד, במקום לנסות לדבג אותו עם צ׳אטGPT, קלוד ועוזריהם. אני ממליץ דווקא להעתיק את גרסת ה-tensorflow שיש ב-teachablemachine ולבקש מה-LLM להמיר אותה.
אם הכל עובד כמתוכנן, הגיע הרגע של לחבר את הכל! ואת זה עושים עם הקוד הזה שאחראי על לקבל את התמונה מה-ESP32 דרך MQTT, להעביר אותה ל-Tensorflow lite, לבצע ניתוח ולצרוח בהתאם לתוצאה!
import os
import time
import numpy as np
from PIL import Image, ImageOps
import tflite_runtime.interpreter as tflite
import paho.mqtt.client as mqtt
import subprocess

# Disable scientific notation for clarity
np.set_printoptions(suppress=True)

# Directory to save images
IMAGE_DIR = "images"
if not os.path.exists(IMAGE_DIR):
    os.makedirs(IMAGE_DIR)

# Paths to the TensorFlow Lite model and labels
MODEL_PATH = "models/kitchen_sink_detector.tflite"
LABELS_PATH = "models/labels.txt"

# MQTT Settings
MQTT_BROKER = "localhost"  # Change if your Mosquitto broker is running on another machine
MQTT_PORT = 1883
MQTT_TOPIC = "esp32/cam/image"

# Load the TensorFlow Lite model
interpreter = tflite.Interpreter(model_path=MODEL_PATH)
interpreter.allocate_tensors()

# Get input and output tensor details
input_details = interpreter.get_input_details()
output_details = interpreter.get_output_details()

# Load the labels and remove any leading numbers
with open(LABELS_PATH, "r") as f:
    class_names = [line.strip().split(' ', 1)[-1] for line in f]

# Debugging: Print class names to verify they are correct
print("Class names:", class_names)

# Track last sink status for empty sink notification
last_sink_status = None  # None means we haven't seen any status yet

# Function to preprocess the image to the input format required by the model
def preprocess_image(image_path):
    image = Image.open(image_path).convert("RGB")

    # Resize the image to the expected input size using LANCZOS resampling
    size = (input_details[0]['shape'][2], input_details[0]['shape'][1])  # (width, height)
    image = ImageOps.fit(image, size, Image.Resampling.LANCZOS)

    # Convert the image to a numpy array
    image_array = np.asarray(image)

    # Normalize the image as per the model's requirements
    normalized_image_array = (image_array.astype(np.float32) / 127.5) - 1.0  # Scale to [-1, 1]

    # Expand dimensions to match the model's input shape
    input_data = np.expand_dims(normalized_image_array, axis=0)  # Shape: (1, height, width, 3)

    return input_data

# Function to run inference on the image using the TensorFlow Lite model
def classify_image(image_path):
    input_data = preprocess_image(image_path)

    # Set the tensor to point to the input data
    interpreter.set_tensor(input_details[0]['index'], input_data)

    # Run the inference
    interpreter.invoke()

    # Retrieve the output from the model
    output_data = interpreter.get_tensor(output_details[0]['index'])  # Shape: (1, num_classes)

    # Get the index of the highest confidence score
    index = np.argmax(output_data)
    class_name = class_names[index]
    confidence_score = output_data[0][index]

    # Debugging: Print classification details
    print(f"Index: {index}")
    print(f"Class name: {class_name}")
    print(f"Confidence Score: {confidence_score:.2f}")

    return class_name, confidence_score

# Function to use espeak for audio output with specified parameters
def speak(text):
    # Set espeak parameters
    speed = '130'   # Speech rate
    pitch = '70'    # Pitch level
    volume = '30'   # Volume level
    voice = 'en+f3' # Voice variant

    # Build the espeak command as a list
    command = [
        'espeak',
        '-s', speed,
        '-p', pitch,
        '-a', volume,
        '-v', voice,
        text
    ]

    # Run the command
    subprocess.run(command)

# Callback when a message is received
def on_message(client, userdata, message):
    global last_sink_status  # Access the global variable to track last status
    print("Image received!")
    try:
        # Save the binary image data to a file
        img_filename = os.path.join(IMAGE_DIR, f"image_{int(time.time())}.jpg")
        with open(img_filename, 'wb') as img_file:
            img_file.write(message.payload)

        print(f"Image saved as {img_filename}")

        # Classify the image using the TensorFlow Lite model
        class_name, confidence_score = classify_image(img_filename)
        print(f"Sink status: {class_name}")
        print(f"Confidence Score: {confidence_score:.2f}")

        # Always announce when the sink is full
        if class_name == "FullSink":
            output = "Alert! Alert! The kitchen sink is full!"
            speak(output)
            last_sink_status = "FullSink"

        # Announce "Sink is empty" only once, when it becomes empty
        elif class_name == "EmptySink":
            if last_sink_status == "FullSink":
                print("The sink is now empty. Carry on. I will watch you.")
                speak("The kitchen sink is empty.")
            last_sink_status = "EmptySink"  # Update last status

    except Exception as e:
        print(f"Failed to save or classify image: {e}")

# Set up MQTT client and connect to the broker using MQTT version 5
def setup_mqtt_client():
    client = mqtt.Client(protocol=mqtt.MQTTv5)  # Use MQTT version 5

    # Attach the on_message callback to handle incoming messages
    client.on_message = on_message

    # Connect to the broker
    client.connect(MQTT_BROKER, MQTT_PORT, 60)

    # Subscribe to the topic
    client.subscribe(MQTT_TOPIC)

    return client

if __name__ == "__main__":
    # Use espeak to announce that the system is ready
    output = "Sink analyzer is ready"
    speak(output)

    # Set up the client and start the loop
    client = setup_mqtt_client()
    print(f"Subscribed to {MQTT_TOPIC}, waiting for images...")

    # Blocking loop to process MQTT messages
    client.loop_forever()
עכשיו נותר לבחון את התוצאה! אם עבדתם מתודית ובצורה מסודרת – זה אמור לעבוד. אבל… אמור זה שם של דג וחלק מהכיף והעניין בכל התחום הזה הוא שכלום לא עובד כמו שצריך 🙂 יכול להיות שהיה שינוי בחבילה מאז שכתבתי את המדריך, שהפורט שלכם שונה, ש… אני לא יודע – אלף שטויות אחרות. אנחנו לא נמצאים פה בעולם plug & play אלא בעולם המייקינג.
אבל כשזה עובד… זה נהדר! הרמקול צווח כל דקה, הילדים המבועתים ממהרים לסדר את הכיור. הם מנסים לתחמן? מצלמה נוספת יכולה לצלם את השיש למשל. וכמובן שאפשר לנצל את זה לעוד שימושים משעשעים במיוחד. השמים הם הגבול.
גם הקוד הזה הוא לא מושלם. הוא שומר את התמונה המצולמת. מתישהו המקום בכרטיס הזכרון יתמלא וכדאי להריץ תהליך של ניקוי. כמו כן, רמקול הבלוטות׳ לעתים הולך לישון וכדי לשמור אותו ער, אפשר לשלוח לו קובץ סאונד שותק כדי לרמות אותו ושיחשוב שהוא פעיל. על מנת לעשות את זה, אפשר להוריד קובץ Silence.wav (יש המון כאלו), להעתיק אותו לרספברי פיי, להכניס אותו למיקום כלשהו ואז להכניס אותו ל-cron. רשימה של תהליכים אוטומטיים. לוחצים על crontab -e ואז מכניסים את הקוד הזה:
*/5 * * * * aplay /path/to/silence.wavאל תשכחו לשנות את ה-path/to למה שאתם רוצים.


תגובה אחת
יש מי שמצא פתרון דומה לבעיות חמורות לא פחות:
https://youtu.be/k02P5nghmfs?si=9GPgNLxnWdCtX3hl